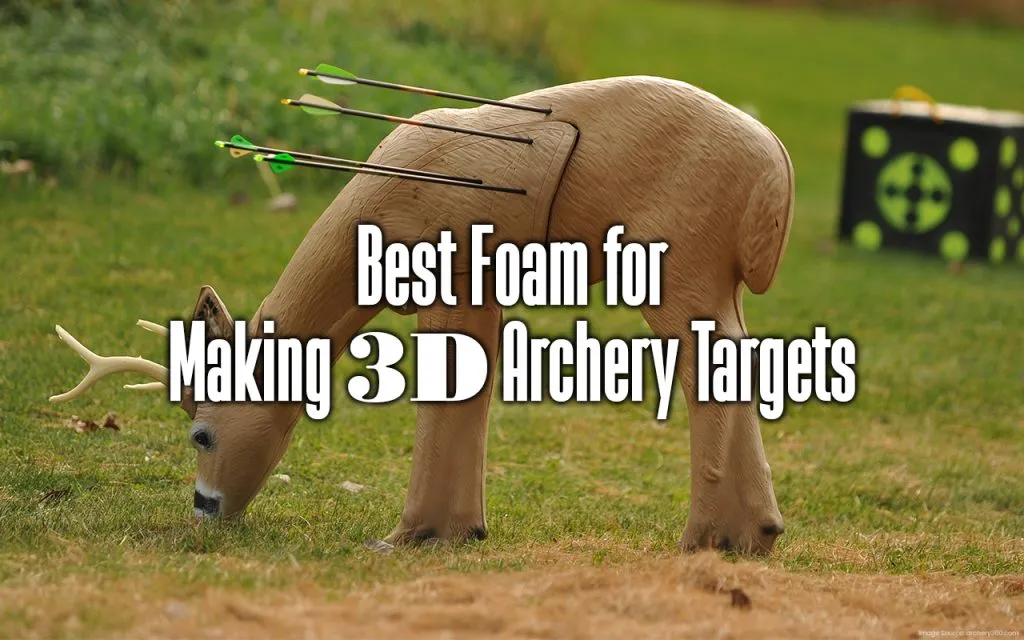
Foam for making 3D archery targets is a specially designed material that is used to create 3-dimensional targets for archery practice and competitions. The foam is usually made from high-density polyethylene or polyurethane, which makes it durable and able to withstand the repeated impact of arrows.
Foam targets are useful for archers because they provide a more realistic practice experience compared to traditional flat targets. 3D targets have a three-dimensional shape and simulate the size and shape of various animals such as deer, elk, turkey, or bear. This helps archers to practice their aim and technique as if they were hunting or shooting at a live animal.
Foam targets are also useful because they can be used both indoors and outdoors, and can be easily moved around to create different shooting scenarios. Additionally, they can be used with both traditional and compound bows, making them versatile for archers of different skill levels and preferences.
Overall, foam for making 3D archery targets is a valuable tool for archers looking to improve their aim and accuracy, as well as their overall archery skills.
The feeling you get when shooting a 3D archery target is intense and exciting. There is something exciting about targeting these figures, whether for accurate shots or simply for some good old-fashioned archery fun; 3d archery is truly amazing. The best foam for making 3D archery targets by using a turkey decoy. Then stuff the decoy with foam that successfully blocked your arrows.
We offer you the opportunity to make your own 3D archery target so that you can have the best possible experience. You can bring that archery joy right to your doorstep with a few quick and easy steps.
The Basics of Making 3D Archery Targets
Table of Contents
Keep in mind that this is a DIY project, so you will need to invest time and effort (and some artistic and technical skills) when constructing your own 3D archery targets. But don’t allow this activity to distract you – after it’s completed correctly, you’ll be confident that your efforts will pay off with exceptional and gratifying archery benefits.
The quickest way to make a 3D archery target is by using a turkey decoy. Simply stuff the decoy with foam, and your arrows will be successfully blocked. The catch is that it is hard to get foam that stops your arrows, whereas it’s easy.
Materials Checklist – The Easy Way
When making 3D archery targets, here are some of the materials and tools you will need:
- A turkey decoy.
- A stick on which to fix the decoy.
- Polyurethane foam in spray form, such as “Great Stuff,” works well for this purpose. You could also experiment with a fence post foam.
- These are not required, but you may use them for added protection against arrows to stuff your decoy. Polyethylene is better than polyurethane in terms of durability.
- Alternatively, wooden boards (two pieces of 2″ x 4/3″ ft.; one piece of 2″ x 4/1″ ft) in which the decoy will sit.
- It’s not required, but it is strongly advised that you bring your safety gear – goggles are a must-have.
Build Your Target
Next comes the difficult (but entertaining) part: to simplify the procedure, we divide the DIY guide into smaller sections.
Preparing the Turkey Decoy
Now you will begin constructing the main part of the 3D archery target.
- Get the decoy out of its box.
- Before continuing, check the bottom of the decoy for a hole. If there isn’t one, cut a hole into it now. You will later use this newly created opening to fill the decoy with foam.
- Prepare the Great Stuff, then fill the turkey with it.
- If you have heavy-duty foam blocks, apply the great stuff to the turkey’s inner side, and stuff the turkey with the foam blocks. You will need to cut the foam blocks into smaller pieces before starting.
- To use the stick as a support for your target, insert the stick into the hole and then apply the Great Stuff.
- Use Great Stuff product to fill the turkey – you might need multiple bottles. Insert slowly to prevent creating air bubbles inside your turkey.
- It will take 24-48 hours for the foam to dry.
- Examine your target after 24-48 hours (and once the foam has dried) to ensure that it feels dense enough. Fire a few shots to ensure it’s working properly. Make sure you have a solid backstop in place if the case doesn’t stop the arrow from striking your target.
You want to check our suggestions for target recurve and compound bows while drying the foam. Some arrows are superior for 3d archery, while others are not.
The Alternative – Fence Post Foam
You may also try using fence post foam in place of Great Stuff to fill your turkey. Note that this is the more difficult way, as the fence post foam could easily overflow the hole and might even shoot out.
- If you’re using a decoy, it’s a good idea to cover it in duct tape (around the holes and on the side) so that overflow foam doesn’t stick to it.
- Use safety gloves and glasses to guard yourself against the foam spilling out of the can.
- Have the decoy ready to go before you start preparing the foam, as you won’t have much time once it’s finished. For the best results, prop up your decoy upside down so you won’t have to hold it. This way, you can solely focus on pouring.
- To prepare the foam, simply empty the smaller bottle into the large one and shake it for 20-30 seconds.
- Then empty the mixture into the hole on the turkey once it is prepared. Make sure the hole is facing away from your face, as the foam will overflow surely.
The foam will require 24-48 hours to dry, and after that, you can remove the part that’s overflown with a knife. The duct tape will make removing the foam from the decoy easier.
Constructing the Stand
You won’t need a stand if you have a stick in your decoy. You can complete the following steps while waiting for the foam on your decoy to dry.
Place the two wooden boards of identical size side-by-side so set them up that they are parallel to one another.
Place a remaining board on top of the two boards that are already parallel to each other. You will understand you have done this correctly if all of the boards form an shape.
Make sure to drill screws into the boards carefully so they are fastened together correctly. You may also do it the easy way by utilizing nails or go all out with screws and a screwdriver.
Combining the Decoy and the Stand
Now that each component of the 3D archery target has been completed, you may combine them together.
- Place your decoy carefully on the ⊓-shaped boards (right in the middle portion).
- Then check to see if the decoy stands upright.
- Use a drill to screw the lower part of the decoy into the boards in the middle portion.
- You’re done!
Check Your Target
Finally, do some testing to see if your 3D archery target is a success. Shoot several arrows in the direction of the target. If the goal can withstand an initial volley of arrows, it’s a fantastic target. You might still be dissatisfied with the conclusion. Here are some modifications you may make:
- If you’re looking to make your target taller, consider replacing your stand. Using the longer wooden boards will give you more space to lift your target up.
- You can save your target from extensive damage. You can apply some more spray foam to the arrow holes after arrow shots. Make sure you allow the foam plenty of time to dry.
How to Make the Moving 3D Archery Target
We’re sharing a guide on how to make a moving 3D archery target – now that’s something fun.
Materials Checklist
Here is what you require for this DIY project:
- A saw
- A pair of pulleys
- A utility knife
- A box of screws
- 4″ x 4″ wooden plank like 18 ft long
- Your 3D archery target
- 1/2 inch wide nylon rope like 90 ft long
However, safety gear is not required, but it is highly suggested.
Build Your Base
Follow these simple steps to set up your very own 3D archery target:
- Prepare the wooden plank.
- Cut the wooden plank into 4 pieces (two planks measuring 6 ft and the remaining planks at 3 ft).
- A 6 ft plank should be paired with a 3 ft plank.
- Make a T-shaped post with each plank pair.
- Attach a 3 ft plank to the top of the partnering 6 ft post using screws.
- Next, dig two holes at each end at a 20-yard distance.
- Make a hole approximately 2 feet deep.
- T-shaped posts should be inserted in every hole.
- Each post is secured in its appropriate holes.
- Attach a pulley to each T-post by screwing one on the bottom of each 3 ft. plank section.
Now that the pulley system foundation is complete, you can begin work on the rope section.
- Prepare the nylon rope.
- Using your utility knife, cut the nylon rope into three sections – one section at 80 ft. and the remaining two sections at 5 ft. each.
- To connect the long nylon rope section, hook it onto the pulleys of each T-post. This rope will be the primary one responsible for pulling your 3D archery target.
- Connect this to each end of the remaining short nylon rope sections by using your carabiners.
- Wrap the 3D archery target’s legs with the short nylon sections.
- Attach the carabiners to the long nylon rope section once it is wrapped tight.
- Raise the 3D archery target up from the ground.
- You are ready to shoot.
Remember that two people must be positioned on each T-post to push and pull the pulley system. This will bring your target closer.
Check Your Target
Always testing is necessary to see if there are any areas that need improvement, similar to the first project mentioned above. In addition, you may make the following implementations:
- You can also build walls in front of the people who are pulling the pulley system if required.
- Consider placing the entire DIY project in an area with a firm backstop. A backstop is necessary that should prevent misfires or friendly fires because of safety concerns. Well, a dirt pile might be a good option in this case.
- Attach another 3D target to the pulley system to boost the excitement and difficulty.
This project adds another aspect of movement to your shooting sessions, making them even more enjoyable.
Fun DIY 3D Archery Target Projects
If you’re in need of 3D archery target inspiration or even some alternatives to mix things up, we’ve got a few suggestions for you below:
3D Animal Target Suggestions
Animal designs are among the most popular choices for 3D archery targets, with deer and turkey being two of the most common options. But don’t stop at this target. You may be as creative as you want when designing a target! Here are some designs to get you started:
- Pigeon(s) – If you find yourself with too many or too few materials, this might be your option. Though they’re smaller, you’ll have double the fun shooting at these smaller targets once you get used to aiming sharp. Furthermore, this target would work well when attached to a pulley system.
- Rabbit – Another great choice if you’re looking for a fun and challenging time.
- Fox – A good choice that may even train you properly when you’re out in the wild.
- Bear – This might be one of the most challenging DIY 3D archery target projects you ever take on. If you’re looking for the adrenaline rush, try shooting at a larger-than-life target.
- Wild Boar – Another excellent choice to help you better understand what to expect while outdoors.
Try designing other targets to see what works best for you.
Alternative 3D Targets
If you’re feeling like trying something new, these conventional archery targets may be for you.
Foam Decoys
Are you having difficulty creating an animal design? Instead, try a basic foam decoy. Please don’t be concerned about how it’ll look. The essential thing is that you have something to shoot at.
Because foam decoys come in various shapes and sizes, you may set them out on a field to shoot. Float on the body of water to simulate shooting ducks for even better results.
Sculpted Targets
This option demands a great deal of artistic talent. However, if you’re confident in your skills, you would be able to design 3D archery targets that are on par with even better than those sold commercially.
By using a foam cutting tool, you can sculpt the layers of glued-together foam into any shape you want. Your skill and imagination only limit you. Here is a great youtube video that demonstrates how to sculpt your target.
Burlap 3D Targets
This choice enables you to strike a balance between design and function. The materials you need to make this costume are simple: simply collect some foam decoys and shape them to your preferred form.
For example, if you wanted a bear. Get enough foam brew to shape the long and oval shape of the animal. After that, simply attach some burlap to the foaming fixture. The burlap can now be used as the 3D archery bear target’s limbs or head.
You may also consider sewing burlap pieces onto the foam decoy to withstand wear and tear. Use your fullest imagination to create something amazing with the common trend among DIY projects.
Upcycle Used 3D Archery Targets
You can use the mix-and-match approach on used or damaged 3D archery targets, as it has proven effective with Burlap 3D target suggestion. There may be old and damaged targets that owners or staff would want to dispose of depending on pro shops or shooting ranges. It would not hurt to ask.
If you are lucky sufficient to get a hold of some old 3D targets, have fun experimenting with ways to improve your shooting. Try combining all of the tips mentioned above.
Safety Reminders
We’ve always mentioned that safety should be prioritized in our DIY guides above. To refresh your memory, let’s quickly summarize some safety tips:
Basic DIY Safety Tips
- Wear protective gear.
- Always remember to maintain a clean working environment.
- Whenever possible, it’s best to have a helping hand for DIY projects.
- Take your time and enjoy yourself. There’s no need to rush.
Basic Archery Safety Tips
- Wear bright clothing when shooting outdoors.
- Always be sure no human targets are in your sight line.
- Do not shoot when in doubt.
- Never shoot arrows in the sky.
- When you’re confident that no one is shooting, only take out the arrows.
Have Fun with Your DIY 3D Archery Targets
We may want to give you the freedom to select by allowing you to construct a 3D archery target in various ways. We hope that you may be given the opportunity to build your own and wish you the best of luck with your DIY archery project.
FAQs
What is the best foam for making 3D archery targets?
Closed-cell foam is considered the best type of foam for making 3D archery targets. It is dense and durable, which makes it able to withstand repeated shots from arrows without breaking down too quickly.
What are the different types of foam that can be used for making 3D archery targets?
The most commonly used foams for making 3D archery targets are polyethylene foam, polyurethane foam, and ethylene-vinyl acetate (EVA) foam. Closed-cell foam is preferred over open-cell foam as it is denser and more durable.
Can I use any foam for making 3D archery targets?
While any foam can technically be used to make 3D archery targets, it is not recommended to use soft, squishy foams like open-cell foam or foam rubber. These types of foam are not dense enough to withstand repeated impacts from arrows, and they will break down quickly.
Where can I buy foam for making 3D archery targets?
Foam can be purchased from various sources, including craft stores, foam suppliers, and online retailers. Choosing a foam that is dense and durable enough to withstand repeated shots from arrows is essential.
How do I choose the proper foam density for making 3D archery targets?
The density of foam you choose will depend on the type of archery you are doing and the weight of your arrows. Generally, a foam with a density of 6 pounds per cubic foot or higher is recommended for making 3D archery targets.
How do I shape foam into a 3D archery target?
Foam can be shaped using a hot wire cutter or a bandsaw. It is essential to wear protective gear when cutting foam, as the fumes can be harmful. Once the foam is cut into the desired shape, it can be sanded and painted to create a realistic-looking target.
How long will a foam 3D archery target last?
The lifespan of a foam 3D archery target will depend on various factors, including the type of foam used, the density of the foam, and how often the target is used. A foam 3D archery target can last several years with proper care and maintenance.
Conclusion
In conclusion, when choosing the best foam for making 3D archery targets, there are several factors to consider, such as durability, density, ease of shaping, and affordability. While several foam materials are available in the market, closed-cell foam such as Ethafoam and EVA foam are popular due to their excellent shock absorption and longevity. However, open-cell foam, like polyurethane foam, can also be a good option for those on a budget. Ultimately, the choice of foam will depend on the individual’s needs and preferences. By selecting the correct foam for your 3D archery target, you can ensure it will last long, withstand repeated shots, and provide enthusiasts with a realistic and challenging experience.


