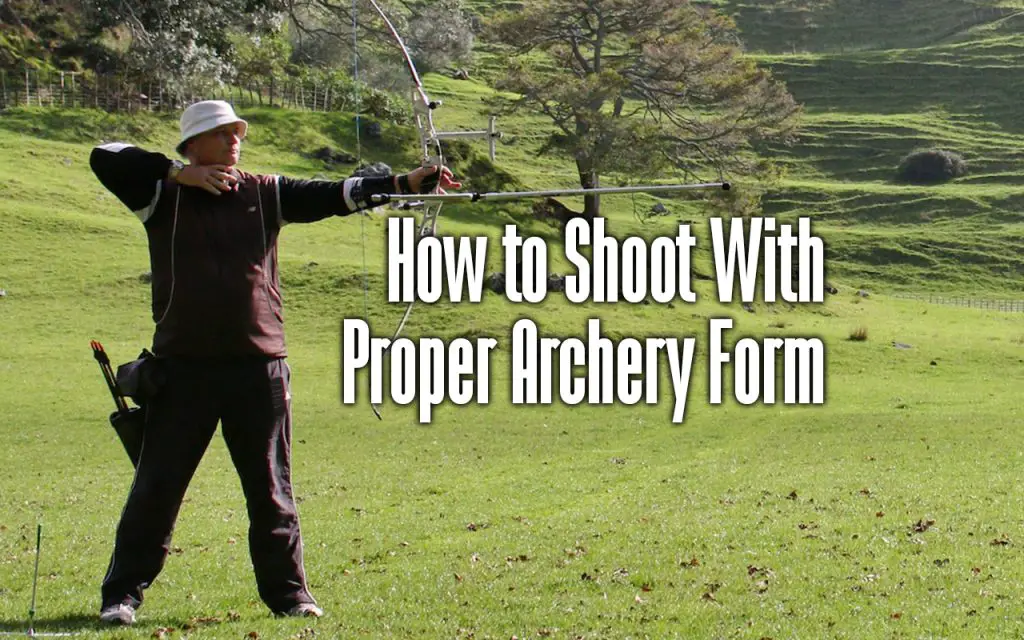
Hunter or target archer. Beginner or experienced. Recurve or Compound shooter. This tutorial will assist you in developing decent archery form and improving your shooting accuracy. It covers everything from the stance through to the release in detail. We go over the fundamentals in each area. Demonstrate what you should and shouldn’t be doing and provide helpful advice and suggestions.
Foreword
Table of Contents
The most important aspect of technique in most sports, especially target sports, is not just good archery form. Its Archery form is constant, consistent, and repeatable. You’ll want to be able to repeat the same actions multiple times. And to get them done without giving them too much thought.
When you’re shooting, make sure you’re calm and at ease. You can relax enough to enter “your zone” or “get your flow,” whatever you want to call it. Getting to the point where everything hangs together in your thoughts. There’s no need for stress or needless energy. Everything is in excellent working order. That is the goal you are aiming for.
Ensuring you have a bow that feels nice to shoot is one of the most important aspects of this. Your bow won’t be as pleasant to use if you have a high draw weight. This is not as significant for a compound bow since the draw weight is drawn through rather than kept. You should be able to handle the draw weight while aiming for both sorts comfortably. The bow should be simple to pull as a novice. You should only increase weight if your muscles have memorized your ideal posture.
Handedness
Are you using the proper handedness of the bow? Bow players who are left or right dominant will have no difficulty determining which handedness is best for them. You should experiment with both methods if you are cross-dominant, Ambi-ocular, or ambidextrous. Find the most pleasant position for you, and practice on that side. We go through everything, from the benefits and drawbacks of retraining muscles vs. retraining eyes.
Stance
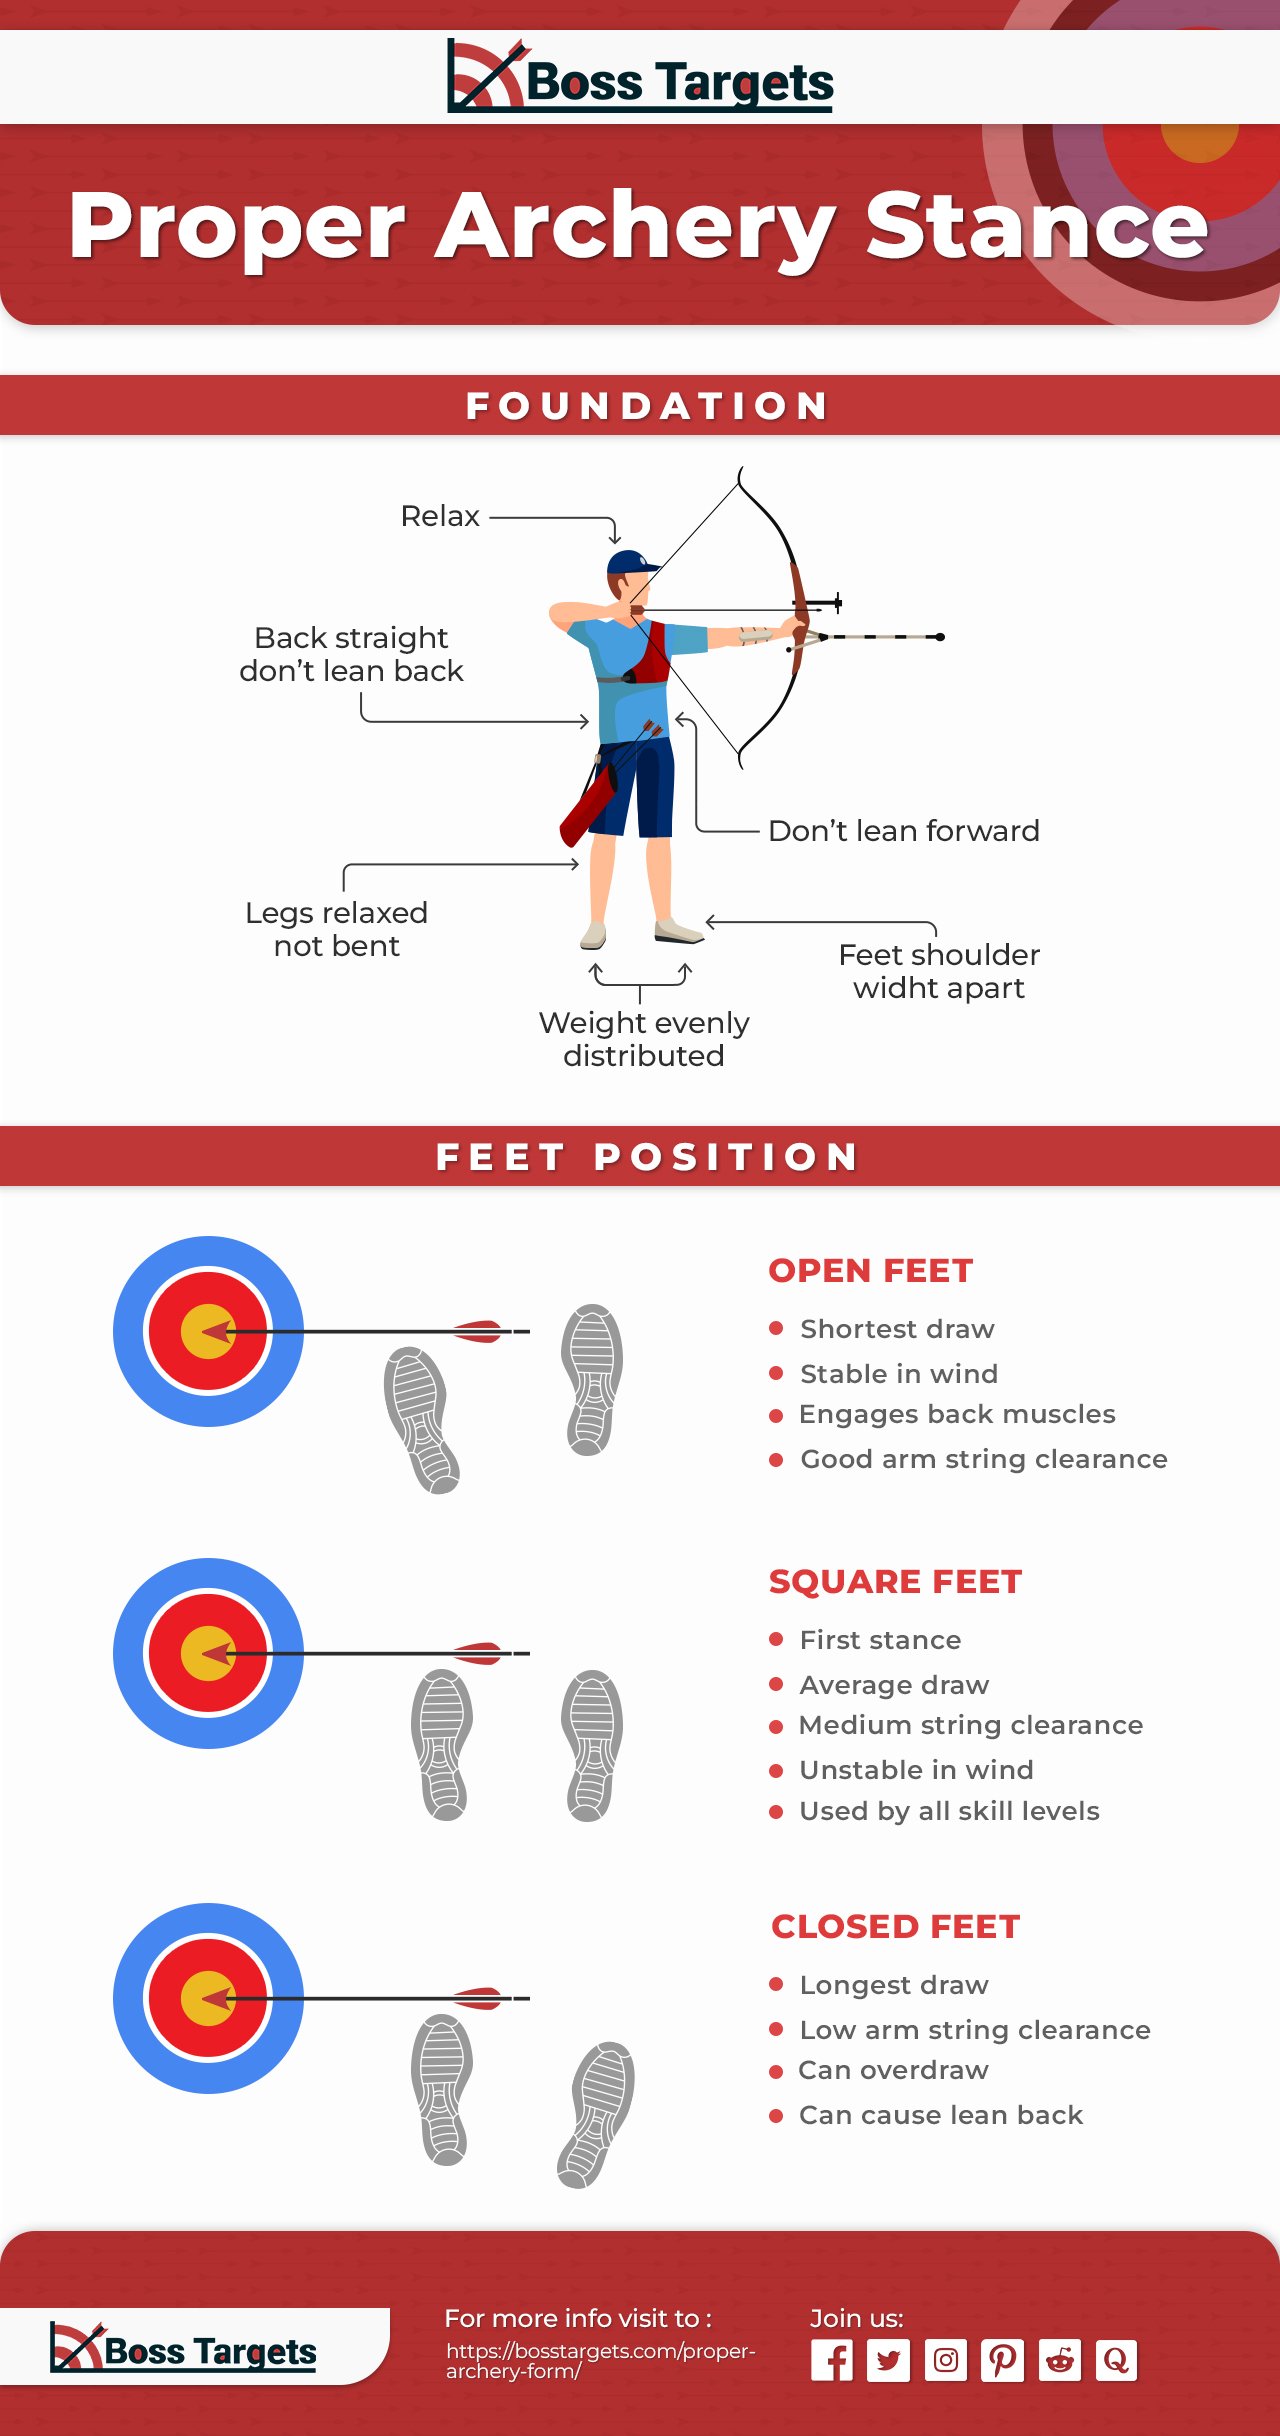
The foundation of every shot is a solid stance. A stance should provide stability and allow you to repeat it without error. There’s more to posture than where you plant your feet. Your back, hips, head, knees, and shoulders are all involved. When people speak about stance, they generally mean foot position. The hip and shoulder position you strike with is determined by your foot position.
Stance Basics
- Step your feet shoulder-width apart.
- Your weight should be evenly dispersed across both of your feet.
- The legs should be kept straight. Knees aren’t locked out or bent unless you have to crouch as a result of the nature of the shot.
- Lean neither forward nor backward. Don’t allow the bow to tip you forward. Don’t compensate for the weight of the bow by learning backward.
- Keep your spine straight.
In archery, there are differently named foot placements. Depending on the individual involved, there will be minor variations in each. The archer in the example is right-handed and faces the target from the side. The left shoulder of the shooter is also facing towards the target. Hold the bow in your left hand and draw the string back with your right. Let’s explore four different foot positions and the advantages and disadvantages of each.
Square Stance
When you are standing side-on to the target with your front foot closest to it. Keep your feet shoulder-width apart. Keep your weight favorably balanced, and let your legs dangle relaxed with both feet pointing outward from the target’s face. When you take this stance, your hips and shoulders will be parallel to the target.
Though this is the first stance you’ll learn as a beginner, it’s fine for all levels of expertise. Archers frequently utilize this stance at the top levels of the game.
Square Stance – Common
If you’re having trouble with string clearance in the square stance above your elbow. Make sure you grip your bow firmly or try slightly widening your stance.
Open Stance
The fundamental open stance has your’ front foot’ pointed outwards. The foot nearest the target is your front foot. The average angle of turn is 30 degrees outward. 30 degrees is a recommended temperature, not a set standard. This movement not only turns your foot but also opens your hips and shoulders to the target. Test it out for yourself. Move your front foot outwards to the target while standing in a square stance. You’ll also feel your hips and shoulders stretch outwards.
This stance is popular, and you’ll see it used often. The new hip and shoulder rotation will help clear the string past the chest and arm. The bow position is now much further away from the chest than it was before. Even more, back muscles are stretched when the shoulders rotate outwards. This exercise helps you connect with the shot as you draw.
Prepare to box. Ready to take on anything that comes your way. This open stance is likely to be your feet posture when you aren’t actively thinking about them. Open postures offer the greatest foot position for avoiding being blown over in windy conditions. They can be helpful for those who frequently shoot outdoors, such as in fields or during 3D archery and hunting.
Natural Stance
A “natural” stance is one of many variations on the open position. This is when the rear foot in an open stance is inclined towards the target as well. It opens the hips and shoulders even more than the open stance towards the target. This could be the right thing for you. You may be more secure with natural, which may be your favorite ready-for-anything posture. The reason for this could be your hip flexibility or build.
Natural Stance – Open Variant
Increased engagement with the shot will be felt even more strongly in a natural stance than in an open one. Furthermore, it will increase the space between your bow, chest, and arm.
Closed Stance
The closed stance is identical to the open stance. This stance rotates your back foot away from the target. Ensure that your front foot is positioned perpendicularly to it. This allows your shoulders and hips to remain in a natural position, pointing away from each other. To aim, you must first twist your body towards the target. If you have a closed stance, the bow and string will be nearer to your body than if you have an open stance. Any space between the string and your chest, elbow, or forearm will be reduced.
Some people find that a closed stance gives them more stability and strength. An archer may find it useful to shoot with a closed stance to increase the draw length. Because you have to extend your arms further when drawing the bow around yourself, it requires more effort.
Which Stance?
The most effective approach to choosing your foot position is to experiment with each of the fundamental four, square, open, natural, and closed. Everyone is unique and has a distinct bio-mechanical composition. You must avoid all incorrect postures at all costs. When your feet are placed too far apart, or both feet are pointed too open or closed to the target. However, don’t be fooled by anybody telling you that your foot position is “wrong” because it does not match one of the four examples presented.
Situational Stances
Various circumstances will result in specific situational postures. Feet must be next to one another in a hunter’s tree stand. When hunting, you might need to crouch. You may be shooting up or down a steep hill and must lower to one knee as a 3D archer. Your hip position is essential in all of these situations. Your hip position determines your natural shoulder position.
Tips
Maintain your feet in place and avoid shifting throughout the entire time you are loading, drawing, and aiming the bow. You’ll discover that this placement helps you shoot more smoothly if you can keep it and are at ease in it. The more confident you are in your stance, the easier it will be to aim and shoot accurately. Time and time again.
A solid posture should be as calm and unforced as possible. Consider it like this: The more turns, twists, or bends you have to make to your body position, the greater number of muscles you tension. When more muscles are under tension, your shot becomes less consistent. This is due to the fact that you’re adding additional variables for your body to manage. Keep it natural and relaxed.
Infographic
Bow Grip
Bad Example
In this section, we’ll begin with an example of what not to do! The way you grip a bow is different than the way you’d hold a bat or an axe. Hollywood actors and models who pose with bows will always grip the bow using their entire hand. This is not the correct way to do it.
It may appear as though you should hold a bow like this, but in fact, doing so makes the shot more difficult. All the muscles in your hand work together when you grip a bow like this.
The muscles work together to aim the shot. After you’ve released the arrow, the grip is free of pressure. The bow propels itself forwards. The temporarily weightless bow responds to the actions of these muscles. They can twist the bow to change the arrow’s trajectory even before it leaves the string.
The Correct Grip
The right hand is referred to as the ‘bow hand’ for a left-handed archer, and the left hand is called the ‘bow hand’ for a right-handed archer. The bow hand is the one you use to pick up and steady the bow.
Make a gun shape with your bow hand by tucking in your little finger, ring finger, and middle finger. Stick out your index finger and thumb. The bow may be picked up and held out in front of you with the finger and thumb of this gun-shaped hand. The bow will naturally draw back into the space between your thumb and index finger as you begin to shoot. This space on your hand is known as the thenar space. You’ll feel the bow pushing back against your thumb at full draw. Picking up a bow in this way is abnormal and incorrect. You’d be dangerously close to dropping it. Most of the time, you’d pick it up using all of your fingers. Prepare to shoot by moving the tiny, ring, and middle fingers into position.
To shoot an arrow from a bow, position your knuckles at a 45-degree angle to the ground when you raise the bow. Once you’re properly positioned, your knuckles should be visible. If you position your knuckles like this, your hand will rotate outward. This allows your elbow to be properly positioned automatically.
If you hold a bow like this and release the arrow, the bow will try to jump forwards. Because there’s nothing between it and freedom, you must take action! You may grab it between your index finger and thumb. There is also a simple aid accessible called the finger sling. This product attaches to your thumb and forms a grip around the bow, keeping it from falling.
Good Example
In the 2016 Rio Olympics finals, here is an excellent example of a good grip. The gold medalist in the 70m recurves uses proper archery form when holding his bow. His knuckles form a perfect 45-degree angle when they touch the floor. His fingers aren’t gripping the riser; they’re just touching it lightly.
Tips
Never, under any circumstances, shoot a bow with your bow hand open, even for practice. It’s a terrible habit, and if you want to shoot a sharpened broadhead with a bow and arrow, it’s quite possible that your finger will fly off. Secondly, you are using more muscles when shooting with your fingers open than in a relaxed position. If you use more muscles when taking a shot, you introduce more variables into the aim, making your shooting less consistent. Keep your fingers in a natural, relaxed position – not too open or closed, and definitely avoid splaying them!
If you tuck your little finger, ring finger, and middle finger into the side of the riser, you may be able to get your knuckles straight to the correct 45-degree angle. This will ensure that your knuckles are positioned at the correct angle.
Nocking
Pull your arrow back with the bow pointed down. Strings usually have tiny brass rings or notches to indicate the nocking point (where an arrow should be knocked). Typically, an arrow has three fletches. As you nock the arrow, ensure that one of the fletches is pointing upwards. This fletch is sometimes color-coded, so it stands out from the others.
The nocked arrow should fit snugly on the string. To shoot your bow, first hold it down and then nock the arrow. It should hang freely from the string, and a light touch should cause it to drop. There is enough clearance to place the arrow on the string when it is at this point. The force was not strong enough to hold back the arrow and cause it to deflect from its flight path, so it was released.
When shooting, compound archers may utilize mechanical release aids. A string equipped with a release aid will have an additional d-loop added to it.
Bowstring Finger Position
There are a couple of widely used finger placements on a bowstring. The hand you use to draw the string is called your ‘tab hand.’ If you intend on shooting for any length of time, you’ll need a finger tab or a plastic shield. Your fingers may become a little sore if you don’t take breaks, but more on that later.
3 Under
The 3 under finger position has your index, middle, and ring fingers all below the arrow. Again, simply relax your little finger and thumb. The 3 under stance might be simpler to master than the 1 over 2 under the arrangement for novices. This is because the arrow can be elevated closer to the eye with this position. When aiming down it with the tip, provide a better sight line down it.
1 Over 2 Under
Out of all the string finger positions, Olympic target archers most frequently use the one over and two under position. Your index finger should be above the arrow, and your middle and ring fingers below it. The little finger and thumb did not hold the string. Allow your little finger and thumb to relax.
Deep vs. Fingertip Grip
Your fingers should only be hooked around the string up to the first joint. The distal interphalangeal joint (DIP joint) is the medical term for that particular type of joint. When releasing the string, any more than this can result in blisters and harm. You want your knuckles on your tab hand to be hidden. If you’re able to curl your fingers all the way around the string, you’ve gone too far. Some people like to grip the string with their fingertips and less with their fingers. You will be more accurate as less of your finger blocks the string’s path when you shoot. It does imply you to keep a greater amount of tension in your fingers, which may be detrimental to that purpose.
Aids
Tabs and Gloves
You may wear a unique 3-fingered archery glove to safeguard your fingers and hand. Finger guards or “tabs” are also available. Just the fundamental sections of the finger are covered. The majority of professionals use tabs rather than gloves. If you’d prefer, you can use nothing at all. This may vary depending on your draw weight and the size of your fingertips. This is something you’ll need to come to a conclusion about on your own.
Mechanical Releases
Many compound bow shooters and hunters prefer a mechanical release in place of fingers. This makes it more accurate. The mechanical release is a device you wear on your wrist, connecting to the bow’s string before you shoot. The d-loop. Both the string and the arrow are then freed using a trigger. Recurve shooters can also use release aids. They don’t do this very frequently because it is against their competition regulations.
Tips
Don’t hurry your finger position. If you’re not employing a mechanical release, check your fingers each time they go on the string. This will assist you in ensuring that you get it right and include it into your shot preparation routine.
If you’re not using a release aid, there should be a tiny gap between your fingertips and the arrow. You don’t want your fingertips to get in the way of the arrow’s flight. You can find tabs with finger separators to help you keep track.
Drawing
You have proper archery form, you’re holding the bow correctly, and it is pointed downwards. Your fingers are on the strings in the correct place; now, you must draw, aim, and fire them. Now that we’ve covered the basics let’s go more in-depth on the topic.
Mock Shots / Dry Firing
Let’s get into archery form before we discuss techniques that may lead you to want to pick up and bow and test things out. NEVER shoot your bow without an arrow, also known as dry firing. If you use the bow incorrectly, it may cause injury. It’s OK to pick up and draw a bow, but don’t release the string until you have an arrow on the rest. If you don’t have a bow, use your arms and imagine them as one. This is a fantastic practice drill!
Bow Arm
Be sure to keep your bow arm (the arm holding the bow) straight until after you release the arrow. You don’t need to lock out your elbow completely if you have overly flexible joints. This incorrect archery form may lead to your elbow protruding and being in the way of the bowstring. Getting hit by the bowstring hurts! Keep your bow arm straight but not so rigid that it’s tense or bent. If you don’t keep your bow arm straight, you will be inaccurate. A bent arm isn’t as powerful as a straight arm, so your draw length will be uneven.
Elbow Rotation
Make sure your grip is tight on the bow with your bow hand and that your knuckles are visible to you and in a line at a 40-45 degree angle from the floor. The following instructions will ensure your elbow is in the proper position. Position your elbow in a way that, if you were to bend your arm, the motion would go towards the side instead of downwards.
The Draw
Before you shoot the arrow:
- Raise the bow and point it towards the target.
- Don’t aim the bow at the ground or up into the sky while drawing.
- Ensure your tab arm’s elbow (the arm that pulls the string) is as high as possible while drawing.
Above the horizontal line of the arrow. Due to this, you will need to use your upper back muscles to draw the string rather than relying on arm strength. Your arm is not as strong as your back. Use your tab hand to draw the bow back while using your entire bow arm to push it forward towards the target. This will cause your arm to be positioned straight.
It’s challenging to maintain proper elbow position throughout the draw. You may need to record yourself or simply mimic draw in front of a mirror a few times to ensure your archery form.
You must use your bow arm to propel yourself forward and your tab hand to pull you back. It should be possible to both push and pull without focusing mainly on one or the other. Your focus may be either pusher or puller type. What is your opinion? Try focusing on one aspect of your draw, such as pulling or pushing, during a few sessions at the range. Once you’re done with one task, move on to the next. A successful archer needs both good push and pull but may only focus on one or the other during the process.
You must practice smooth drawing movements. You may accelerate the start of the draw. Once you get close to full draw, slow down so that you can Anchor consistently. Keep your head and body still while you’re drawing. A compound bow is one that will have a backstop in place, meaning the string can only be pulled back to a certain point. It will then refuse to draw anymore. Draw to the full extent of the bow before establishing your anchor point for a compound shot. Draw naturally into your anchor point when drawing back for a recurve bow.
Aids
Clickers
Competitive and experienced recurve archers use clickers. This product gives you the perfect length for your bow every time with just a few clicks. A clicker has the potential to divert your attention away from what you’re working on. Perhaps you’re putting yourself in a bind by forcing yourself to fire early just because you hear the click.
Mechanical Releases
Always position your finger behind the trigger when you are using a mechanical release so that you only shoot when you’re ready. You want to avoid accidentally releasing the bowstring before you’re ready.
Tips
If you can’t comfortably draw the bowstring back while keeping the arrow pointed at your target, that means the draw weight is too high. Try setting it lower. Keep your shoulder down and away from your ear. Keep it quiet, but don’t make it too low. Place it where it feels most natural.
Get better at using your entire bow arm by placing your palm on a wall and pushing against it with your hand. Next, your wrist. Push with your arm, then your triceps, and finally your whole arm. Remember that entire arm sensation as you are pushing.
Anchor Points
The anchor points are where you pull back the string to secure it before aiming your shot. An anchor point is a tactile touchpoint you can feel on your face. A spot that allows you to tell if the string is not aligned correctly. As it has always been. You’ll need a lot of these touch points. The nose, cheeks, lips, mouth, chin, and neck are all excellent options. The more points of reference you have, your results will be more consistent.
People use different anchor points depending on their preferences. There are usually differences in the anchor points used by traditional or barebow, recurve, and compound archers. The length of the draw, bow size, and mechanical aids that might or may not be used can all contribute to this.
Side Anchor
The side anchor is one of the first anchor points you’ll learn when you visit an archery range. This involves holding the tab hand at the side of your face and tucking your index finger’s tip into the corner of your mouth. Your top finger should rest under your cheekbone, with your thumb tucking at the back of your jawbone. This provides three points of reference.
The side anchor is a great way to aim if you shoot a traditional bow or recurve without sight. This is because it provides a better view of the arrow than a low anchor.
Low Anchor
The low anchor is a kind of anchor that archers at the Olympic Games use. The Olympic anchor is a term you may come across. With your index finger resting on your jawline, the string will make contact with your chin. You’ll probably make contact with your nose, giving you three great reference points. Hold the string to your chin and nose, then touch your finger to your jaw.
While you may learn with a side anchor, there will come a time when you want to shoot long distances. Or shoot with a sight. When that happens, a low anchor is preferable to the side anchor.
Using a side anchor will teach you the basics, but eventually, you’ll want to be able to shoot from a farther distance. Or use a sight. It is usually better to utilize a low anchor than a side anchor when that happens.
Compound Anchor
The compound bow is somewhat smaller than the recurve. When the bow is fully drawn, the angle between the string and the archer’s face is greater. A compound archer can’t touch the string to both his chin and nose at the same time because of this. When using a mechanical release, compound archers may rest their chin against the corner of their mouth. They also use a kisser at times.
A kisser is a tiny gadget that pushes against the lips at full draw and is attached to the string. This makes the archer feel more connected to the string.
Tips
The essential point to remember is that it’s the same spot every time, no matter where you anchor. This will assist you in creating consistency.
You should always have 2 or more contact points between your bowstring and face, OR your hand and face. The more points of reference, the greater the chances of finding a good, repeatable anchor point.
Aiming
If you don’t have a sight, use the arrow’s tip as a guide. If you have a sight, you’ll have a pin in sight to assist you. When shooting an arrow, you typically aim slightly above your target since arrows tend to drop during flight.
It may appear to be an obvious point, but I urge you not to strain yourself to achieve your goal. Gently persuade it. Overcompensating will result in your aim bouncing all over the place. To get the arrow to go where you want it, simply guide your body in that direction.
If you’ve done this right, the sight will appear to float around your target. It will be aligned correctly eventually. This is where you ought to let the arrow fly. Keep your gaze forward and ignore the temptation to lower your head to take aim. Use your dominant eye to aim, and close the other one.
Tips
Keep going. Pull the entire length of the aim. Avoid putting your muscles in a holding position; it will wear them out more quickly. Aim for the entire length of your draw. You should strive to achieve your intended goal.
Aim for a duration of 3 to 6 seconds. This becomes especially significant with a recurve bow since you must support more weight. The added stress on your muscles may cause your aim to drift after some time. If you aim for a longer period than necessary, pause and recalibrate your shot.
Release
Let go of the string by unclenching your hand. Try not to jerk the string back but gently release it from your fingertips. Any other activity might send the arrow off target. Don’t let your front arm fly up after you let go.
If the string hits you, it can hurt – even making you fear the release. Wearing an arm guard is ideal. Today, there are various types and styles available. You’ll be glad you got arm support before you ever injure your arm.
Archers Paradox
The Archers Paradox is a term used to describe the fact that you can’t hit a target (with particular bows) by aiming the arrow directly at it. The arrow generally rests at one side of the riser and must travel around the riser to strike the target when released. This is another topic for another time, but as you let go of the string, it will wobble around your fingers before correcting. The arrow will bend because of the immense weight placed on it when shot. The initial deflection of the arrow is only added to when a release is around the fingers.
For this reason, archers utilize mechanical aids. There’s no need to overcome a finger when using a mechanical release aid. This reduces the amount of deflection that enters the arrow flight.
Tips
It may be tough to perfect, but it is best to let go at the same point in each breath. This ensures that your body is in the same posture when you let go each time.
Follow Through
Finish your tab hand behind your neck and not drop once you’ve let go of the string. If your bow is maintained properly, it will drop forward. Regardless of what changes, your goals should remain the same.
Maintaining a pulling and pushing action with your back and bow arm is vital. Keep both in a push/pull configuration for the duration of the shot, and maintain an excellent arm position. A good follow-through will automatically happen at the point of release. Your shoulders will come together the final few inches. Next, your hand should automatically raise and move to the back of your neck.
Tips
It is critical for you to follow through. Keep your bow arm and tab hand still after you release the arrow, and don’t move until you see the arrow hit the desired target.
The Result
Did you reach your goal? In archery, it’s not always about how close you are to the target during practice. You should be concentrating on your group. Is it possible to frequently hit or group your arrows in the same location? If you can do that, you’re on your way to having great repeatable and consistent archery form. It’s unimportant that the arrows may all be situated 3 meters to the left of the target. That can be fixed. You can adjust your aim 3 meters to the right. You can’t just fix an issue of inconsistency so easily!
Mental Game
Most people can’t focus intently on one thing for longer than three seconds. Soon after, other thoughts and distractions begin to encroach upon their mind. It’s essential to have a long attention span in archery for success. Make it last the whole length of your shot cycle. The sequence is: draw, aim, release. An excellent way to take your shot is by getting yourself into a meditative state. Take note of everything that is going on around you at the time. Allow yourself to feel the bow in your hand and the air fill your lungs. Don’t overthink it, just enjoy the moment.
Back To Basics
The greatest thing you can do if you’ve lost your mojo is go back to basics. Decrease the draw weight on your bow and move the target closer to you. Take some time to just shoot for the sake of shooting. Remember how satisfying it is to make a solid shot, and then start moving up the scale when you’re ready.
Positive Mental Reinforcement
Think about shooting arrows. Imagine yourself hitting the mark while you’re at work or during your lunch break. If you aren’t afraid of looking silly, mime the motions of shooting an arrow without a bow in your hands. The first step in any action you take is from your mind. Your body will follow when your mind is focused on good archery form and hitting the target.
Tell yourself that you can and will achieve things when you talk to yourself. Stop convincing yourself that you’re unable to do something great.
Develop Your Own Style
Every archer has their own style that is slightly different than other archers. There is no one definitive style that you need to stick to. In this post, I’ve outlined the fundamentals and given you a decent idea of an excellent archery form. You must establish your own style that may be reproduced time and time again. Draw, hold, follow through repeat this action again and again. Practice it. Don’t try to imitate other people’s styles; instead, create a natural manner for yourself. Get your rhythm and relax into your shot.


