Preface
[Updated 1 January 2024] You probably understand the importance of having a consistent form while playing target sports. Archery is no different. You need to shun unnecessary effort or stress and make sure you a consistent form that can be in a comfortable, and relaxed manner.
One of the keys to this is ensuring you have the right bow, is that it should feel comfortable when you shoot. If the weight is too heavy, the bow won’t feel comfortable and holding the draw while maintaining the target will be very difficult.
Finger Positioning
Table of Contents
Finger positioning plays a crucial role in the outcome of every archery game.
Why is this the case?
Think of the crucial role an anchor plays in supporting a boat from swaying hither and tither. That’s why you need to position your fingers in the correct anchor point.
It’s important that you pay close attention to where you position your fingers. A second look pays bountifully in the overall outcome of your shot.
This is no easy task, especially for beginners, it’s a huge challenge when one is learning the skill. But there’s a remedy, don’t rush while making a shot. As a beginner, I used to hastily place my fingers on the string. This had a negative effect on my shot, but I failed my way through and learned the hard way.
Finger pressure also comes in handy while making a shot. If you apply excessive pressure, you might sustain injuries on your fingers. While in other cases, you might blow out on your target. To make an accurate shot, you need to catch consistently and correctly. This applies to your hand perspective as well as the finger positioning.
Beginners often have a hard time anchoring, but if you’re able to get the right support point, it becomes easy. This is a spot on your face where the archer pulls the bowstring.
Anchor factor
The anchor factor guarantees consistency in the draw-hand position, thus giving the arrow an accurate trajectory. Luckily, when I got introduced to the game, my trainer helped me build a support point. If you’re a beginner, ask your trainer for support point advice. They’ll be glad to help you. If using an ideal recurve bow. But recommend that you move the bowstring to a consistent anchor point for every arrowhead.
The other dynamics that play a huge role are muscle movements and the strength of your shot and how you finish the shot. Weak shots come about when you try too soon. Getting the proper muscle movements is also crucial.
Considering the strength, as soon as you make a full draw and are ready to aim at your target, remain hard so that you can have a reliable release. Providing a follow-through is also important. This is determined by how you use your muscle mass. If you’re able to combine these factors with proper timing, you’ll increase your chances greatly.
How to Hold the Bow String
This guide will take an in-depth look at how to hold your bowstring. Nothing fancy, you’re probably an expert in this so just quick dive. There are different ways to do this, so we also consider different archer preferences. But the idea is to choose what works best for you and get it right.
Styles of Drawing
There are styles used by archers while drawing. They include:
- Thumb draw
- Pinch Draw
- Three-finger draw (Mediterranean Draw )
Mediterranean Draw
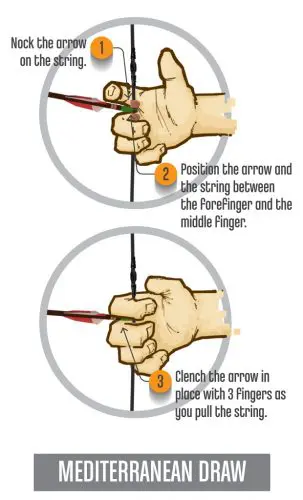 This is the most commonly used type of draw. You’ll notice that most archers prefer the three-finger draw. It’s actually the best draw for beginners.
TECHNIQUE
The idea is to create a hook using your hand. The first joint of your fingers should be placed on the bowstring. The pointer finger should be positioned above the arrow while the ring and middle fingers should be below the arrow.
Take the time to relax the thumb and bend it down. Please note that the pinky finger is not involved.
There are some archers who grasp the bowstring close to the fingertips, instead of putting the first joint on the string. This is also debatable.
As a beginner, you might need more control. In this case, just grab the string using the first knuckle joint. This is a pretty easy technique for a beginner to start with.
Important Tip On Grasping the Draw String
Protect Your Fingers with Equipment
We’re not implying that bare-finger shooting is impossible. I’ve tried it several times but it’s very painful. The same happens to players who’ve not developed the callouses needed to make a bare-finger shot possible. Even Olympians use special equipment to protect themselves from injuries.
Commonly Used Equipment
Finger Savers
Made of flexible rubber, these finger savers are placed on the bowstring at that spot where you put the arrow. This spot is known as the nocking point.
All you have to do is to wrap your fingers on the fingers savers and then make your draw. As a beginner, you definitely need one of those. Else, if you make your way to the archery range they have plenty of them.
Archers who decide to abandon finger savers end up adopting a proper nock on the bowstring. The nock is a spot that acts as a reminder to archer on the exact position where the arrow attaches to the string.
This is where finger tabs, release aids or gloves come in handy.
Finger Tabs or Gloves
They’re ideal for use with recurve bows. They come with three fingers which are made of leather.
Personally, I’d rather go for the gloves. But whichever suits your preference will be based on how comfortable it is.
Release Aids
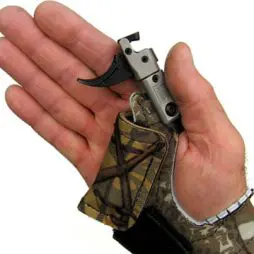 This tool helps archers to get a clean release. This equipment is common amongst compound bow users. An arrow’s trajectory can be altered by finger tabs and gloves. To avoid this, you need a release aid.
Types of release aids:
Remember to place the first joints on the bowstring thus creating a hook. The pointer finger should be located above the arrow while the ring and middle finger below the arrow. The thumb should be kept low.
Correct Handedness
Getting an accurate finger position starts with having the correct handed bow. Whether right or left, its very easy to know. Find a comfortable bow and train with it.
Stance
Stability is correlated to a good stance. It lays a perfect foundation for every shot you make, it also gives you consistency. It’s not just about where you place your feet, body, or shoulders. However, all this plays a crucial role while adopting the right stance.
In most cases, people talk about the foot position while referring to the stance. The foot position usually determines how your shoulders and hips are positioned.
Stance Basics
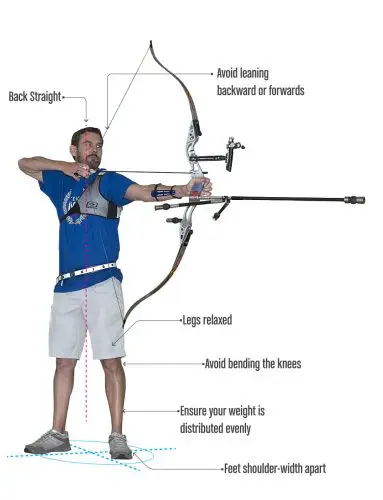
- Legs should be relaxed while standing.
- Avoid bending your knees excessively.
- Make sure you’re standing with your feet shoulder-width apart.
- Ensure your weight is distributed evenly.
- Avoid leaning backward or forwards.
- The bow should not tilt you forward.
- Back Straight
- Foot placements vary depending on the kind of shot one is making. Whether you’re right or left-handed, that plays a crucial role.
Foot Positions and Their Pros and Cons
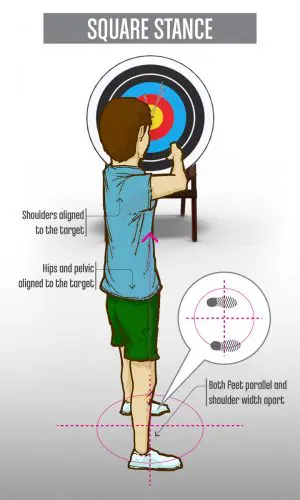
 Square Stance
This stance requires the archer to stand side-on such that both the shoulders and hips are aligned on the target. The archer’s feet should be shoulder-width apart, while both feet should point perpendicular to the target. Remember to remain relaxed with the weight distribution being even.
This stance is acceptable for all skill levels.
Note:
Ensure your bow grip is correct as you adopt this stance. Else, you can go for a more open stance. This will save you from issues with string clearance.
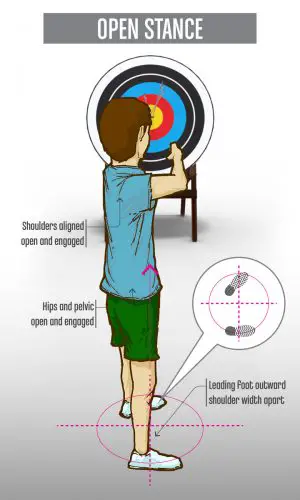
Open Stance
This stance requires you to turn the front-foot outward. Just turn your foot about 30 degrees outwards such that the front foot is close to the target. The idea here is to open your shoulders and hips to the target.
Open Stance – Popular
This stance introduces shoulder and hip rotation with the goal of increasing string clearance. This is this stance is very popular. The outward rotation also draws on the back muscles thus making you feel engaged while you shoot your target.
The idea is to adopt the best foot position to keep you stable. These open stances come in handy in many target disciplines.
Natural Stance
This is another variant of the open stance. In this stance, the back foot remains in an open stance while being turned towards the target slightly.
The idea is to open the shoulders and hips towards the target. Please note that you need to open more compared to the open stance. The stance feels stable and natural due to hip flexibility.
Natural Stance – Open Variant
The idea here is to engage the archer by increasing the clearance between arm, bow, and chest. The feeling of engagement is more compared to the open stance.
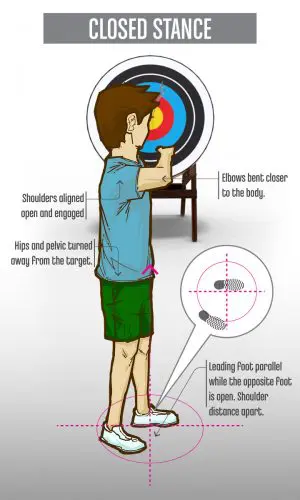
 Closed Stance
This stance requires your back foot to be turned away from the target. It’s the opposite of the open stance. However, the front foot is kept perpendicular to the target. The hips and shoulders are left in a natural position although away from the target.
Also, the torso is twisted towards the target. The string and bow are brought closer to the body. It also reduced any clearance that exists between your chest, forearm and elbow and the string.
NOTE:
There are archers who feel comfortable using a closed stance. As such, they have more strength and stability. In other cases, the closed stance comes in handy in increasing an archer’s draw length. This comes from the extra tension that is exerted on the arm.
Selecting The Best Stance
Preference is based on the comfort level one gets while adopting the different stances we’ve mentioned above. Just make a point of trying the basic 4 and then make a decision. We’re all different due to the variation in our bio-mechanical constitution.
It’s advisable to avoid adopting the wrong stance because it will have a negative effect on your shot. Cases where both feet are widely spread, or too closed or open should be avoided.
Bow Grip
It’s unacceptable to grip a bow with the entire hand. It makes your shot harder now that more muscles will be involved. The muscles may start to twist the bow, this may alter the arrow’s trajectory and that’s not what you want.
The Correct Grip
The bow hand depends on the archer’s handedness. If they’re left-handed, the bow had will be the right hand.
Tip
- Avoid shooting a bow while your bow hand fingers are open.
- Avoid shooting with your fingers open. This is because you end up using more muscles.
- Using more muscles causes more inconsistencies.
- Shoot while your fingers are relaxed.
Bowstring Finger Position
It’s important that you have a finger tab to protect your fingers from becoming sole. The tab hand is the hand you use to draw the string. There are different bowstring finger positions that archers use, so let’s take a closer look.
3 Under
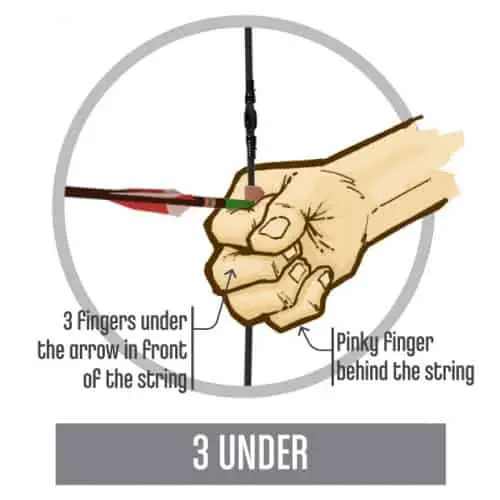
For this bowstring finger position, the ring fingers, index fingers and middle fingers should be located below the arrow. As mentioned earlier, this position is ideal for beginners who’re trying to improve their skills. This finger position allows the player to elevate the arrow near the eye, providing a better sightline.
1 Over 2 Under
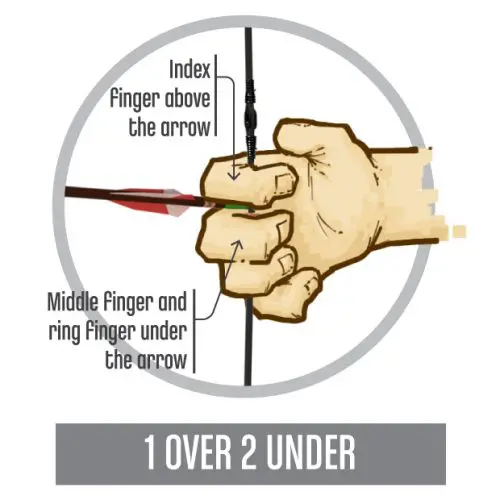
The index finger is positioned above the arrow while the ring and middle fingers are below the arrow. This should be done while the thumb and little finger relax.
Deep vs Fingertip Grip
Remember to hook the fingers on the string up to the first joint on your finger. The first joint is known as the distal interphalangeal joint. If you go further than this, you increase the risk of sustaining injuries and blisters.
To do this effectively, make sure you’re not seeing the knuckles on your tab hand. But if you’re seeing them it means you’ve curled up your fingers too far. However, there are people who prefer to hold the string with a fingertip grip. This is beneficial to accuracy but its counter-productive since you have to hold more tension in your fingers.
Tips
Avoid rushing your finger placement.
Take the time to look at your fingers while you place them on the string.
Limit the amount of space between the arrow and your fingers, unless you’re using a release aid. This will help you to avoid interfering with the arrow’s trajectory.
Drawing
Before drawing, stand correctly and grip the bow pointing to the floor. Make sure your fingers are in the right position on the string.
Mock Shots / Dry Firing
NOTE:
Never shoot an empty bow, this may injure you or damage the bow.
But if you need to make a mock shot you can draw but don’t release
Bow Arm
Always make sure that the arm holding the bow is straight. It shouldn’t be bent, this should be the case until it’s released. Bow arm ought to be straight. Also, avoid unnecessary tension. The goal is to achieve some level of consistency. A bent arms will is bound to give you inconsistent draw lengths while it’s not as strong as a straight arm.
Elbow Rotation
To do this make sure you can see your knuckles while you grip the bow with your bow hand. The idea is to position your elbow correctly such that if you bend the arm it will bend sideways.
The Draw
To make a proper draw, aim the arrow at the target while raising the bow. Then pull the string and release.
Avoid drawing while the bow is pointed to the sky or towards the ground. The elbow of the tab arm ought to be high. This allows the archer to use the upper back muscles to draw the string. Remember that the back is stronger than the arm.
Elbow Positioning During Draw
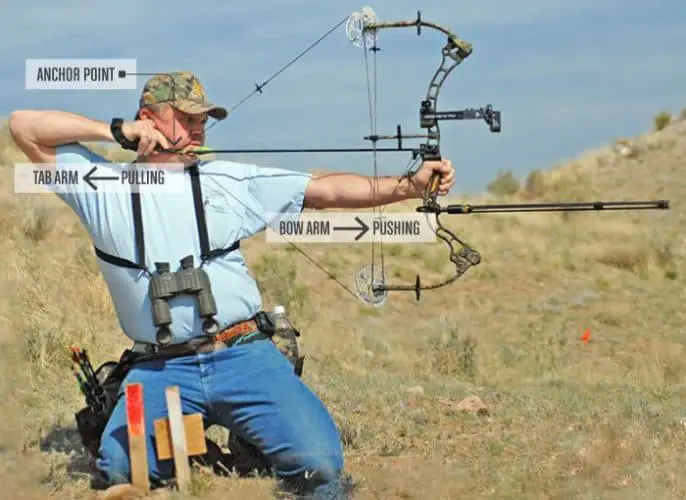 Adopt the proper form for the elbow position while you draw. This is not an easy task, you might have to record yourself and involve another person to help you. Else, you can use a mirror.
The bow arm should be used for pushing while the tab hand for pulling. The two movements ought to be done effortlessly without excessive pressure. Remember that a good archer has good push and pull yet they may only concentrate on one or the other.
The drawing motion ought to be smooth. However, the goal is to facilitate a consistent anchor. The other thing is you need to avoid moving your body or head as you draw.
Aids That Archer’s Use
Clickers
This tool clicks once the arrow is drawn back, thus optimizing the bow length. However, you need to cautious while using this tool. It might cause you to shoot early once the clicker goes off.
Mechanical Releases
We mentioned this earlier on. The idea here is to make sure that the finger is behind the trigger, giving you some time to prepare.
Ensure that your finger is behind the trigger before you shoot.
Tips
If you notice difficulty while drawing the bow back, there’s a high probability that the draw weight is on the high-end.
Restrain your shoulder to avoid creeping towards the ear. You do this by keeping the shoulder in a natural form.
You can train this by pushing with the entire bow arm on a wall.
Start pushing with the wrist, triceps and then the entire arm.
Anchor Points
This is the point to which you pull the string back so as to anchor it in position. It’s actually a point of reference. It can also be a point on your face. It allows you to determine if the string is aligned accordingly.
It’s advisable to have several anchor points, this will give you consistency while making shots.
Different archers have different anchor points, this stems from the variations in the length of the draw and size of the bow. Also, mechanical aids play a huge role.
Side Anchor
If you have been to an archery range, you’ve probably been taught this anchor point. With the side anchor, you just draw back the tab hand on the side of your face while tucking index fingertip on the corner of your mouth.
The top finger should rest underneath the cheekbone while the thumb tucks behind the jawbone.
This anchor point works best when shooting a traditional bow.
Low Anchor
This anchor is often used by Olympic games archers. That’s why its also known as the Olympic anchor. The index finger of your tab hand needs to rest on the jawline as the string gets some contact with the chin. There’s a high chance that the string will also make contact with the nose. There are three points of reference with this anchor point:
String to chin and nose
Finger to jaw
The low anchor is ideal when you need to shoot over a long distance.
Compound Anchor
This anchor point is smaller compared to the recurve. With this anchor point, the angle between the archer’s face and the string is greater.
Tips
Consistency is key when anchoring. This is because you anchor in the same exact position.
Consider having different points of reference. This will greatly increase your chances.
Aiming
This should be a daunting task since the tip of your arrow can help you. You just need to use it as a guide. The idea is to aim the arrow above the target since it drops as it approaches it.
Also, don’t apply excessive force in an attempt to hit the target. The aim might jump all over, just keep in mind the point you want to hit with the arrow.
Encourage your body to move the arrow on target.
You don’t want the aim to jump all over.
If this done effectively, the archer is able to see the sight floating on the target. After a few attempts, they will align accordingly. As soon as they align the archer can release the arrow.
Don’t tilt the head forward, just keep it straight.
Aim with the dominant eye while the other one is closed.
Keep your head straight – you will have the urge to tilt your head forward when trying to aim, but it is very important you keep it straight.
Close your non-dominant eye and Aim with your dominant one.
Tips
Pull through the aim.
Resist the urge to stop pulling the string.
Relax the muscles by letting go off the holding configuration.
The idea is to draw into the aim, going all the way. Especially if you’re holding more weight, for instance in a recurve.
If the stress builds up on your muscles just relax to avoid drifting the aim.
Release
To achieve an effective release, just relax the fingers. Avoid jerking the string back. The idea is to release smoothly and gently. Taking unnecessary action might send the arrow away from the target. Also, the front arm shouldn’t be allowed to rise once you release it.
Make sure you wear an armed guard to protect you from injuries. You don’t want to get hit by the string, it’s very painful.
Archers Paradox
The idea behind the archer’s paradox is that archers are not able to hit a target by pointing the arrow directly at the target. However, this applies only to certain bows. With most bows, the arrow leans on one side of the riser, thus it has to move around the riser.
Also, the arrow is likely to flex due to the weight of force imparted on it. This is why you need a mechanical aid to limit the deflection during arrow flight.
Tips
Release at the same point during your breathing cycle so that your body is in a consistent position.
Follow Through Hand Position
To get an accurate follow-through, you need to unleash the string by finalizing with your hand behind the neck. If done correctly, the bow will drop forwards. Considering everything else, it should all end the same as though you’re still aiming at your target.
Caution, while still pursuing the follow-through resist the urge to cease pulling through the arm.
Throughout the configuration, you have to retain the push/pull while retaining an appropriate arm position. If done effectively, the follow-through will fall in place with little to no effort. However, expect your shoulders to close in the last few inches. Also, your hand will obviously raise and shift towards your neck.
Tips
Remember that the follow-through plays a crucial role in the outcome of your shot. In any case, make a point of staying calm and relaxed while retaining your position as you watch the arrow hit your target.
This Game Is All Mental
To be a successful archer, you probably know the importance of retaining your focus for a prolonged period of time. That’s exactly what you need to make it in archery.
Don’t let your thoughts distract you from hitting your target. This is why you need to increase your attention span.
The other key is to remain calm and mindful. This will help you a great deal. When transitioning from aim to release, make a point of retaining your focus. You need to feel the bow while it’s in your hands. Also, avoid overthinking and analysis.
Frequently Asked Questions(FAQs)
What is a bowstring made of?
Most modern bowstrings are constructed of durable materials such as B50 Dacron or Dacrogen with just a slight stretch, allowing for consistent shooting while being gentle on the bow and archer.
What can I use for bowstring?
You can use traditional materials for the bowstring, including linen, vegetable fibers, sinew, hemp, silk, and rawhide. The type of fiber used in an emergency will depend on the situation. Natural fibers would be unusual on a modern recurve bow or compound bow, but they are still effective and utilized on traditional wooden or composite bows.
What string is best for a bow?
On older teardrop-style compound bows and crossbows, Dacron string performs very well. It is also an excellent bowstring material for traditional wooden bows with non-reinforced limb tips.
Conclusion (You Need To Develop Your Own Style)
Take a closer look at the archers in your range and you’ll notice that they all have different forms and styles. That’s exactly what happens due to the varying preferences amongst archers.
It’s up to you to determine what works for you. If done effectively, you’ll find the appropriate form and style are repeatable for consistency purposes to adopt, and this will greatly boost your performance.


 Closed Stance


5 Comments
Very informative article thanks alot
Pingback: Best Bowstring Waxes for Lengthens String Life - Boss Targets
Pingback: The Best Survival Bow 2021 - Boss Targets
Pingback: How to Nock an Arrow - Boss Targets
Pingback: How to Shoot With Proper Archery Form - Boss Targets